Kubernetes集群架构深度解析 - 核心组件与设计原则
深入分析Kubernetes集群架构,详解Control Plane和Node组件的职责分工,理解Pod创建流程和关键设计原则
深入分析Kubernetes集群架构,详解Control Plane和Node组件的职责分工,理解Pod创建流程和关键设计原则
We know the basic buffer IO flow is to write the data into a dirty page on memory, then an asynchronous writeback thread will flush the dirty page onto the disk. Unlike the direct IO, the buffer IO is not only controlled by the io controller but also controlled by the memory controller.
In March 2014, kernel merged the pr cgroup: implement unified hierarchy about unified architecture in cgroup, that is the basic design of cgroup v2.
There is the code of the main process of cgroup init. In the process of cgroup init in the function of “cgroup_init”, after setting up the cgroup root, initiating the subsystem of the cgroups and creating the mountpoints, the kernel registers the different cgroup filesystems on that mount point according to different cgroup types:
1 | int __init cgroup_init(void) |
When register_filesystem, cgroup v1 and v2 register different filesystem operations:
1 | static const struct fs_context_operations cgroup_fs_context_ops = { |
When doing the mount, the kernel tries to call the .get_tree interface to bind the filesystem on the directory by do_new_mount -> vfs_get_tree -> fc->ops->get_tree(fc). There are the different call path of the cgroup v1 and v2 implementations of .get_tree:
1 | int cgroup1_get_tree(struct fs_context *fc) |
Because the mountpoinst are different names, every mount will produce a new cgroup root and the cgroup root link to the subsys of cgroup. The cgroup_root represents the root of a cgroup hierarchy which is organized as a tree. Every tree is a hierarchy structure and it is independent. The child cgroups from cgroup root can only inherit the sussystem with parent cgroup and can not quickly visit other subsystems in cgroup v1. Though it has a root_list to store all the cgroup root, it is hard to cooperate with each other.
1 | /* |
But in the cgroup v2, all the subsystems are bind to one cgroup_root because it is only one mountpoint and normally using the default cgroup root:
1 | static int cgroup_get_tree(struct fs_context *fc) |
The default cgroup has all subsys_mask. All the child cgroup from the root cgroup will bind the subsystem cgroup by enabling it in the parent cgroup’s cgroup.subtree_control. So the different subsystems can have easier cooperation with each other.
1 | int __init cgroup_init(void) |
After the kernel added a unified cgroup hierarchy, another patch writeback: cgroup writeback support merged in January, 2015. It adds a feature and framework to support the writeback control by cgroup. Then the ext4 filesystem added the support with writeback cgroup ext4: implement cgroup writeback support at Jun, 2015. But xfs filesystem implements the support at [V2] xfs: implement cgroup writeback support on March, 2018. So on some old kernel versions, the xfs filesystem does not support cgroup writeback.
Now let’s do the deep dive about how the kernel implements the cgroup writeback. The implementation of cgroup writeback is complex with many different packages and adds many new changes after the original patch. Here we just analyze and focus on the latest kernel version and skip the history and change from the first patch.
There is full flow of write:
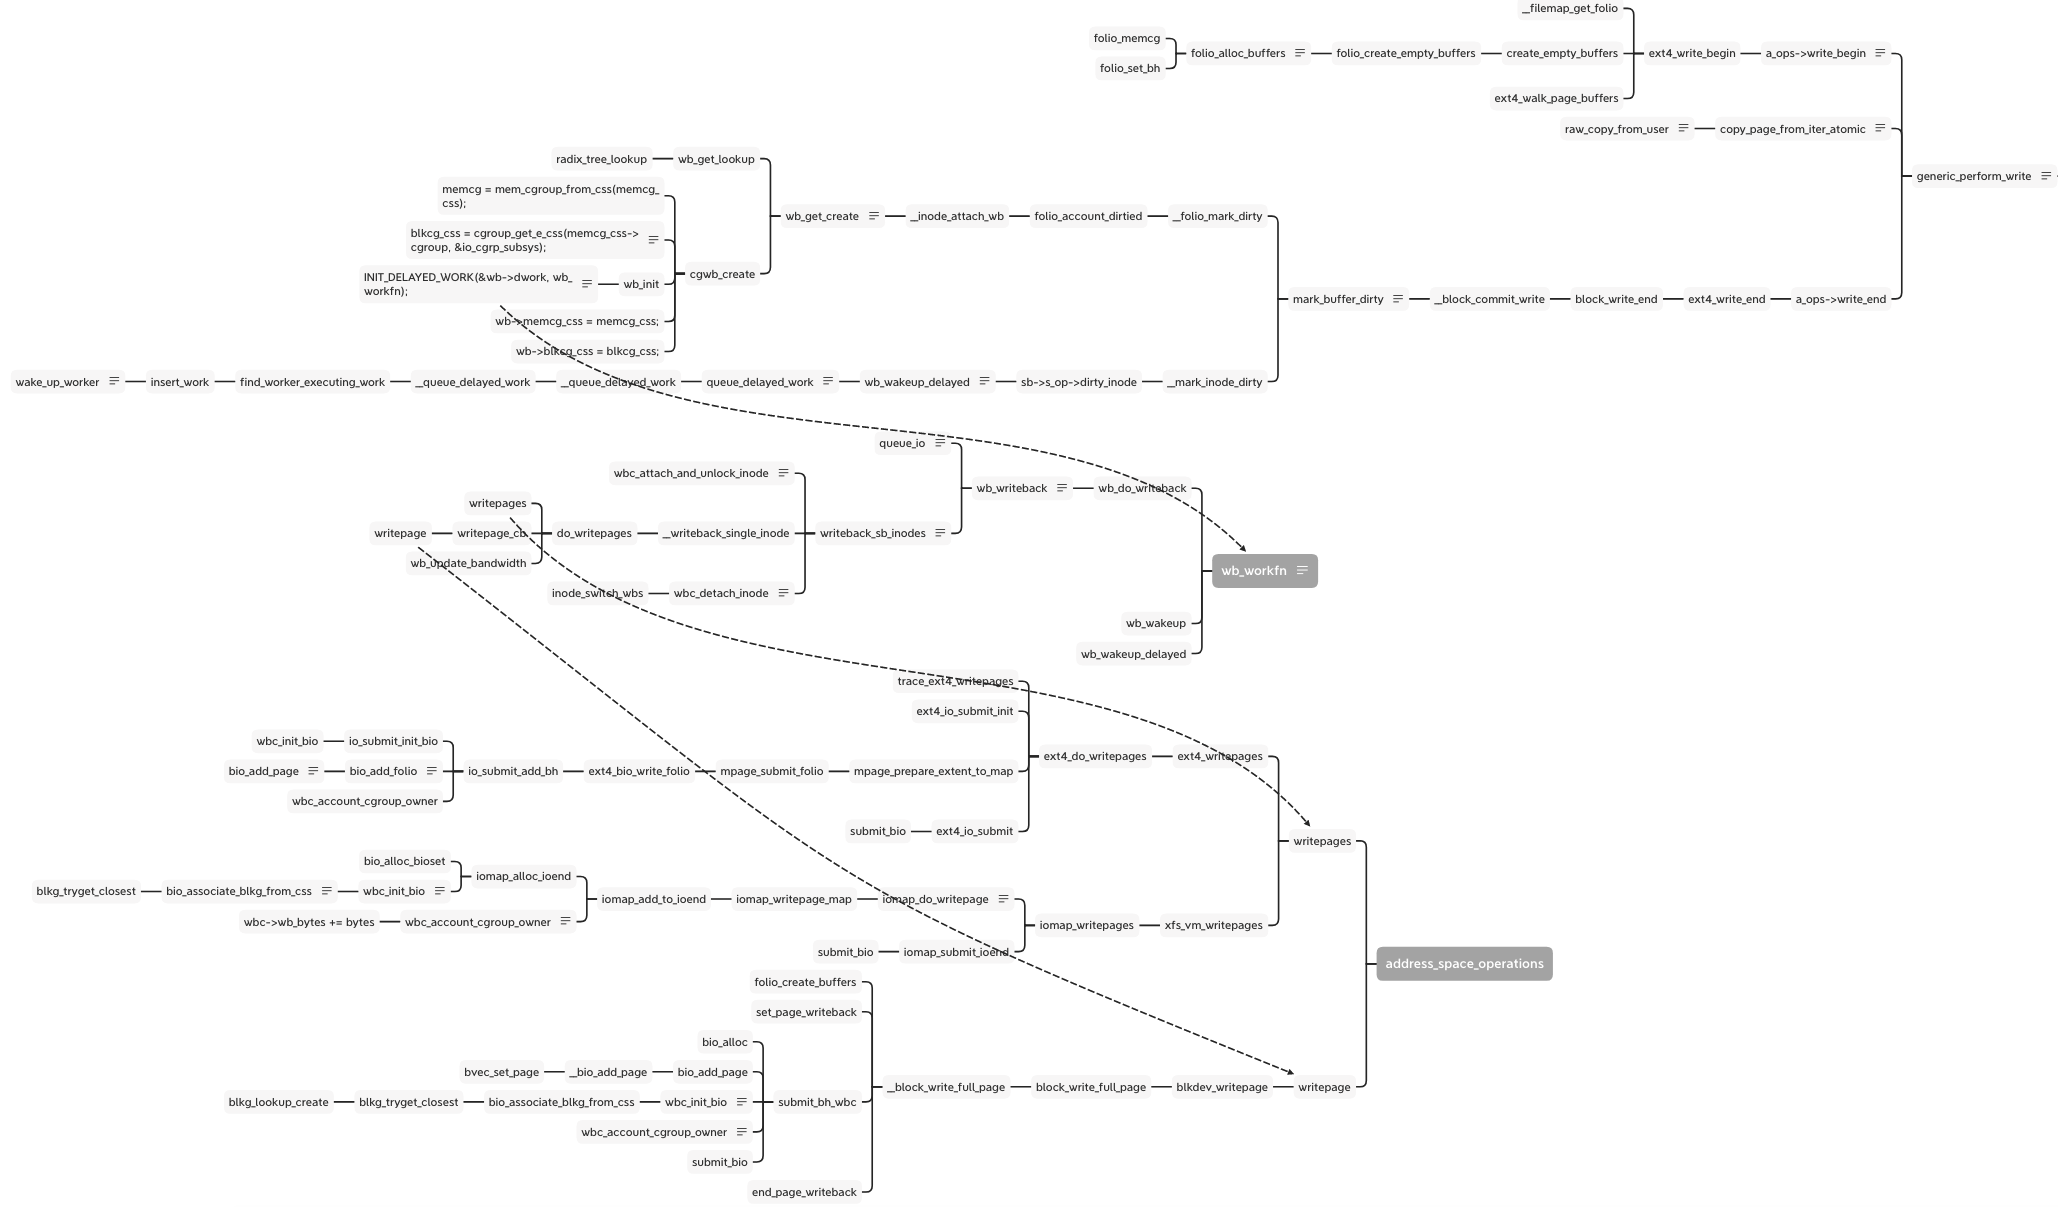
As the write as example, there is the simplify flow from syscall of write to enter of block layer:
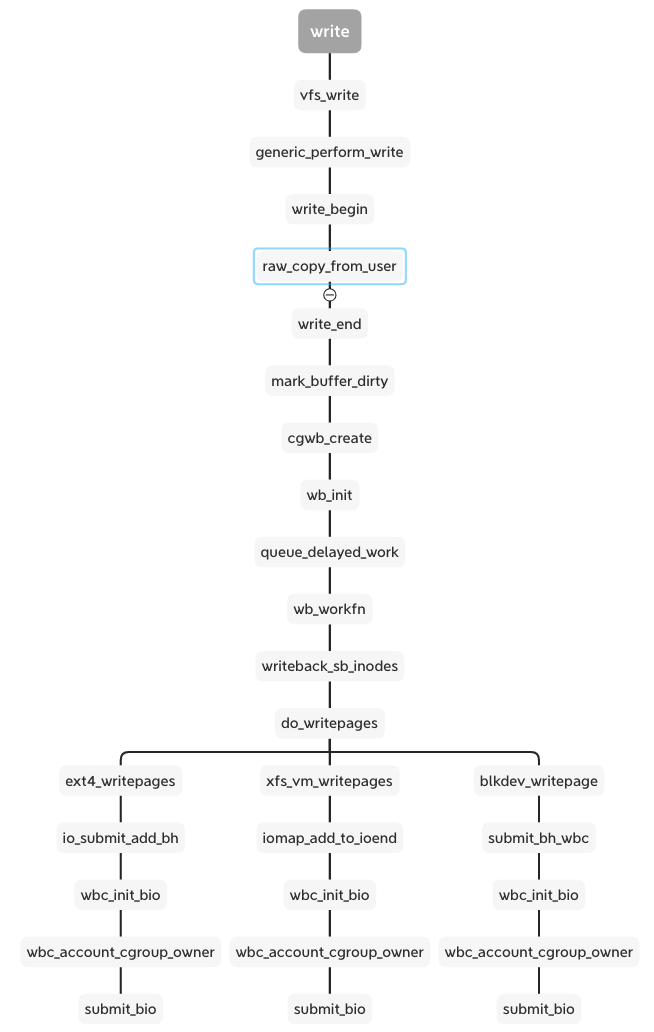
When calling the write syscall with buffer io, vfs calls the generic_perform_write function and runs the interface write_begin and write_end in proper order. Between them, the raw_copy_from_user is the real data write from the user space into the kernel space of the memory area. In the write_end stage, mark_buffer_dirty function marks the memory page and inode is dirty and wait to writeout:
1 | void mark_buffer_dirty(struct buffer_head *bh) |
The __mark_inode_dirty function calls the __inode_attach_wb to create a bdi_writeback structure and attach the inode into it. The cgwb_create function creates a bdi_writeback for this memory cgroup and adds it into the bdi->cgwb_tree and by wb_get_lookup to get the bdi_writeback.
1 | void __inode_attach_wb(struct inode *inode, struct folio *folio) |
The cgwb_create function is important, because it get the IO subsystem blkcg_css according to the memory cgroup by cgroup_get_e_css.
1 | static int cgwb_create(struct backing_dev_info *bdi, |
For the cgroup v2, the cgroup_get_e_css gets the IO css from the cgroup because all the subsystems bind to the cgroup. But for the cgroup v1, only the subsystem currently binds to the cgroup, so the cgroup_css returns NULL and goes back to the parent cgroup and finally gets the empty cgroup and breaks the loop. Then return the init IO css. But this css doesn’t contain the process and cgroup information. I think it is just for compatibility with cgroup v1 to return the init css.
1 | // cgroup_get_e_css - get a cgroup's effective css for the specified subsystem |
Besides binding the cgroup, bdi and inode, the bdi_writeback needs to attach a real worker function to flush the diary page out to disk. This step at wb_init:
1 | INIT_DELAYED_WORK(&wb->dwork, wb_workfn); |
The __mark_inode_dirty adds this work into the delayed work queue for the idle worker to do the flush work. The wb_update_bandwidth_workfn according to the writeback IO time, dirty writeback numbers and the completion writeback numbers to calculate the bandwidth of the writeback and update the dirty_ratelimit. There are some algorithms but not the point in this topic, just skip them.
1 | static void __wb_update_bandwidth(struct dirty_throttle_control *gdtc, |
1 | /* |
Now the wb has been prepared, it links to the real worker waiting to write out. It links to the inode, bdi, memory cgroup and IO cgoup. They can provide the information when writing out.
The wb_workfn function runs the __writeback_single_inode and calls the interface of writepages or writepage. The different file system and backend implement the interfaces. But they have a similar process including wbc_init_bio and wbc_account_cgroup_owner before submitting the bio.
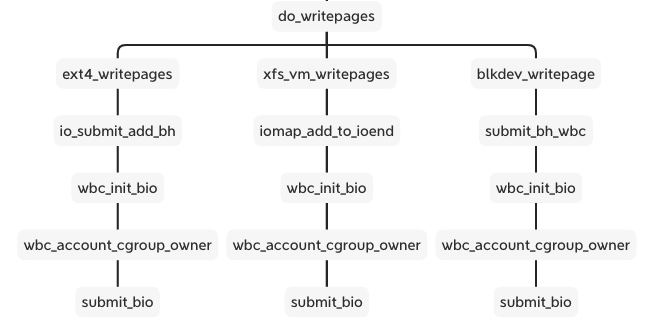
These two functions are patches added to the xfs and ext4 cgroup writeback support. We can see the cgroup v2 documentation about Filesystem Support for Writeback:
1 | Filesystem Support for Writeback |
The wbc is writeback_control which manages and controls total writeback flow and stores the bdi_writeback and inode.
1 | /* |
wbc_init_bio() binds the specified bio to its cgroup which binds at cgwb_create function.
1 | static inline void wbc_init_bio(struct writeback_control *wbc, struct bio *bio) |
1 | // bio_associate_blkg_from_css - associate a bio with a specified css |
Here the bio binds to the IO cgroup on bi_blkg, if the css is empty, it will bind to the root cgroup.
The wbc_account_cgroup_owner is a solution for this question: if multiple processes from different cgroup write into the same inode, how to decide who is the owner of this inode right now. The wbc_account_cgroup_owner counts the pages to different cgroup by memory id. After finishing the current writeback, the wbc_detach_inode function uses Boyer-Moore majority vote algorithm to select the owner of this inode, then calls inode_switch_wbs to switch the bdi_writeback for the inode.
1 | // wbc_account_cgroup_owner - account writeback to update inode cgroup ownership |
1 | /** |
The cgroup v1 returns the root cgroup as well because it can not handle this case.
So in cgroup v2, before entering the block layer, the filesystem layer has decided which IO cgroup binds to this bio according to the inode and memory cgroup. The bio contains the io cgroup and then it is transferred to direct IO after calling submit_bio.
1 | struct bio { |
There are the different throttling files with cgroup v1 and v2
1 | static struct cftype throtl_legacy_files[] = { |
1 | static struct cftype throtl_files[] = { |
In cgroup v2 we only need to set all the disk IO limitations like read/write bps and iops on io.max file. Once we set the io.max, all the blk cgroup configs are set to the throtl_grp structure by tg_set_limit. Here the doc focusing on the cgroup v2 implementation.
When registering the blk throttle to the disk, it sets the throtl_slice according to different disk types. That is the default window of calculating the throttling IO.
1 | void blk_throtl_register(struct gendisk *disk) |
Following the tg_set_limit function, the tg_conf_updated is important function to update the throtl_grp and calculate the wait time and dispatch time of the bio.
1 | static void tg_conf_updated(struct throtl_grp *tg, bool global) |
1 | static void tg_update_disptime(struct throtl_grp *tg) |
The dispatch time use the minimum of the write wait time and read wait time calculated by the tg_may_dispatch. Then add the throtl_grp into the service queue wait to dispatch. Every update the io.max, the kernel need new window slice to throttling.
1 | static inline void throtl_start_new_slice(struct throtl_grp *tg, bool rw, |
The global variable jiffies holds the number of ticks that have occurred since the system booted. On boot, the kernel initializes the variable to zero, and it is incremented by one during each timer interrupt. Thus, because there are HZ timer interrupts in a second, there are HZ jiffies in a second. The system uptime is therefore jiffies/HZ seconds.
It is similar for the disk IO to the cpu: dividing the disk resource into time according to the disk frequency. The “time” is not the real linear time but it is “jiffy” which the numbers of the tick from uptime. So the uptime = jiffies / HZ.
The core algorithm is that for every cgroup for this disk, kernel use sibling window (slice) to decide how much time the bio need to wait or just dispatch. It calculates the max bps or iops in this window. If the latest bio is exceed the numbers of the bps or iops, it extends the window and wait time of the window end. So it is not the fixed slice except the new slice of beginning. The details of the implement is in the tg_may_dispatch.
1 | /* |
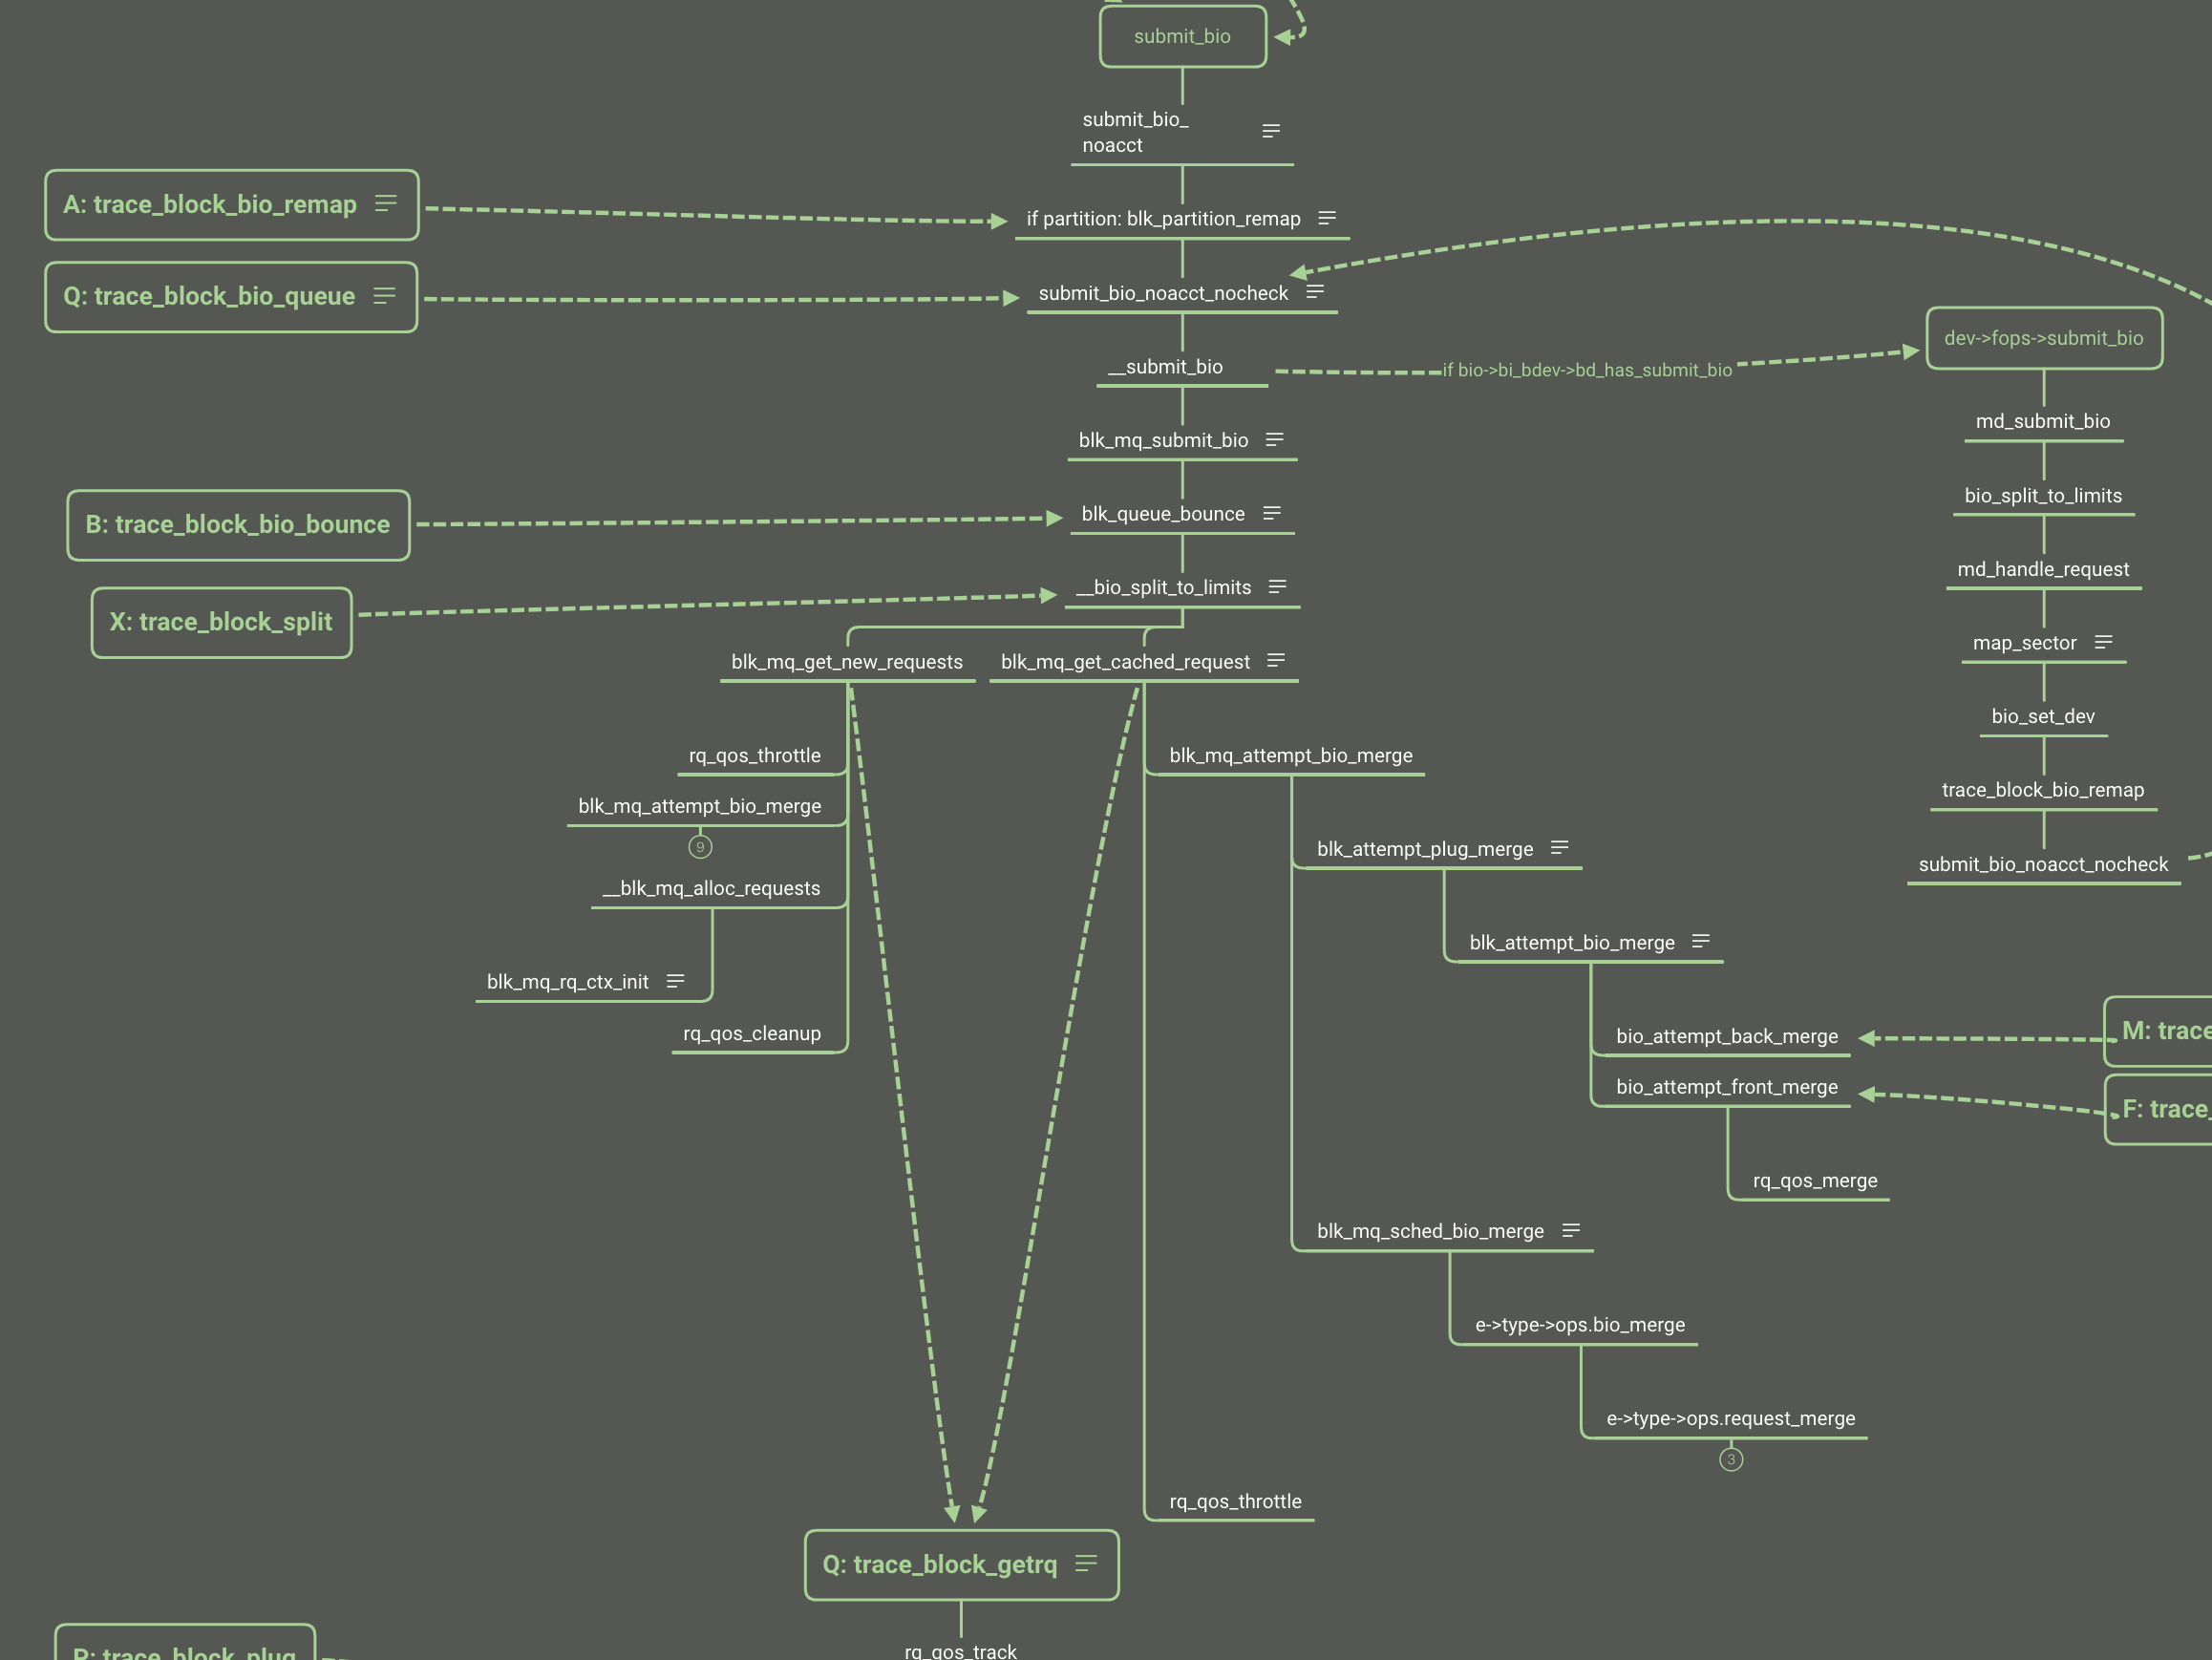
Now we look back to the bio follow and the blk_throtl_bio is between the A and Q.
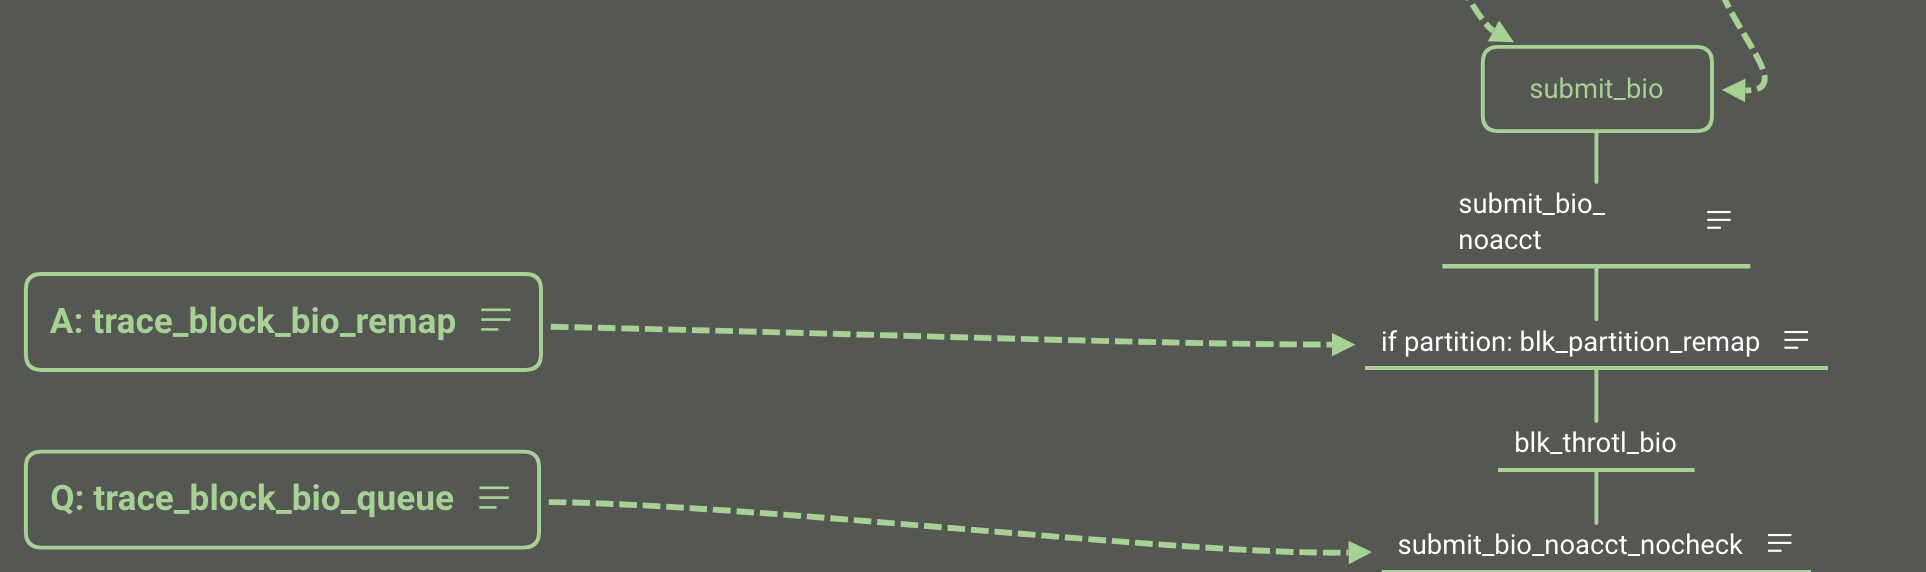
If set to io.max, every bio goes through the _blk_throtl_bio and runs tg_may_dispatch to check whether the bio can be dispatched directly or not. If not, calculate the wait time and update the timer with the minimum wait time from the rb_tree. Finally it adds the bio into the service queue and waits for the timer to run the next dispatch loop.

Both of them are controlled by the rq_qos structure:
1 | struct rq_qos { |
The rq_qos is the singly linked list. There are 3 rq_qos plugins that can be used: blk-iolatency, blk-iocost and blk-wbt.
1 | static struct cftype iolatency_files[] = { |
1 | static struct cftype ioc_files[] = { |
We have learned the block layer basic follow and we can know the place of rq_qos throttling.
IO QoS has complicated algorithms for different policy and implementation. Here is just making an entrance but not deep diving. I will make another article to talk about the disk IO QoS.
When the pod is terminating and csi inline volume is deleted, the kubelet down or restart impact the volume become orphan and pod skip delete and unmount the volume. The error message show as follow:
1 | Mar 12 00:28:56 tess-node-kltc4-tess19.stratus.lvs.ebay.com kubelet[1526549]: I0312 00:28:56.150307 1526549 state_mem.go:36] "Initialized new in-memory state store" |
From the error messages, we can know what happened:
1 |
|
When reconstructVolume gets an error, the volume can not be added into the ActualStateOfWorld in kubelet, then the kubelet will skip this volume unmount when pod deleting.
1 | reconstructedVolume, err := rc.reconstructVolume(volume) |
So there is a bug that the csi ephemeral volume should go into ‘GetUniqueVolumeNameFromSpecWithPod’ not **‘GetUniqueVolumeNameFromSpec’. **That means csi ephemeral volume should not get the attachablePlugin and deviceMountablePlugin.
1 | if attachablePlugin != nil || deviceMountablePlugin != nil { |
This place should use _FindDeviceMountablePluginBySpec_ not _FindAttachablePluginByName_ to get the volume plugin:
1 | attachablePlugin, err := rc.volumePluginMgr.FindAttachablePluginByName(volume.pluginName) |
Actually, due to pod is terminating and pod not added into the DSW, when reconstructVolume failed, the kubelet still try to unmount and clean mountpoint for this volume:
1 | func (dswp *desiredStateOfWorldPopulator) findAndAddNewPods() { |
But in this time, the container was not finished the container termination, so the volume remove failed, this is the last chance to recycle the volume:
1 | [CSI local driver]2024/03/29 03:10:59 logging.go:26: Serving /csi.v1.Node/NodeUnpublishVolume: req=volume_id:"csi-17ef0134f9c76245a954e751a3ebdb57a965d6cf5ea66a6f19bc4b6aa37bad11" target_path:"/var/mnt/kubelet/pods/8c76f1db-b963-4cfc-96b7-6f81fd9781f6/volumes/kubernetes.io~csi/data/mount" |
So the conditions of producing orphan csi inline volume should be:
The upstream has reported and fixed this issue at 1.25 version: https://github.com/kubernetes/kubernetes/pull/108997
I backport the related pr into our kubernetes repo: https://github.corp.ebay.com/tess/kubernetes/pull/2289
Before the bug fix rollout, we need manually remove the orphan volume, else it might impact the new pod creating local pvc.
After I audit, I only see the orphan volumes in cluster 40. We can do a change to fix them after kubelet rollout.
1 | /* per device */ |
1 | /* per device-cgroup pair */ |
Y_4K/y_b = a + b* X_4K / X_b
Y_4k = a* X_4k Y_b / X_b. a= Y_4k * X_b / (X_4ky_b)
Ssd iops: a_8k= 70k8k / (4k51k) = 2.745
a_16k = 70k * 16k / ( 29k * 4k) =
y = a+ bx + cx2
SSD:
<4k:
IOPS = 80000
BPS = 80000 * x
4k-16k:
BPS:
IOPS = y/x = 70M/x + 57k - 2 * x
BPS = 70M + 57k*x - 2x^2
x > 16k:
BPS = BPS_16k
IOPS = BPS / x
NVMe:
<=16k
BPS = 150000 * x
iops = 150000
HDD:
<=16k
BPS = 100 * x
IOPS = 100
270M = a + b * 4k + c * 16M
400M = a + b * 8k + c * 64M
460M = a + b * 16k + c * 256M
130M = 4k * b+ c * 48M
60M = 8k * b + c * 192M
200M = - c * 96M
c= -2.08
b = 57.42k
a = 460M - 918.72M + 532.48M = 74M
(y_4k, 4k).
Comprehensive quick reference guide for Linux networking data structures, kernel functions, system calls, and debugging commands. Essential resource for network developers and system administrators.
Master essential Linux networking tools and scripts for debugging, performance testing, and network analysis. Learn packet tracing, comprehensive debugging, and systematic performance evaluation.
Explore cutting-edge Linux networking features including eBPF programming, XDP high-performance packet processing, and advanced optimization techniques for maximum network performance.
Explore the application interface to kernel networking - system calls, namespaces, and data path optimization.
Deep dive into IP packet processing, routing decisions, and netfilter framework. Learn how Linux handles network layer protocols.
Explore Linux network devices, sk_buff internals, and Ethernet driver implementation. Foundation layer for understanding kernel networking.