We know the basic buffer IO flow is to write the data into a dirty page on memory, then an asynchronous writeback thread will flush the dirty page onto the disk. Unlike the direct IO, the buffer IO is not only controlled by the io controller but also controlled by the memory controller.
In March 2014, kernel merged the pr cgroup: implement unified hierarchy about unified architecture in cgroup, that is the basic design of cgroup v2.
There is the code of the main process of cgroup init. In the process of cgroup init in the function of “cgroup_init”, after setting up the cgroup root, initiating the subsystem of the cgroups and creating the mountpoints, the kernel registers the different cgroup filesystems on that mount point according to different cgroup types:
When doing the mount, the kernel tries to call the .get_tree interface to bind the filesystem on the directory by do_new_mount -> vfs_get_tree -> fc->ops->get_tree(fc). There are the different call path of the cgroup v1 and v2 implementations of .get_tree:
int cgroup1_get_tree(struct fs_context *fc) { … ret = cgroup1_root_to_use(fc); if (!ret) ret = cgroup_do_get_tree(fc); … }
/* * The guts of cgroup1 mount - find or create cgroup_root to use. */ static int cgroup1_root_to_use(struct fs_context *fc) { for_each_root(root) {
/* * If we asked for a name then it must match. Also, if * name matches but sybsys_mask doesn't, we should fail. * Remember whether name matched. */ if (ctx->name) { if (strcmp(ctx->name, root->name)) continue; name_match = true; }
ctx->root = root; return 0; } /* * No such thing, create a new one. */ root = kzalloc(sizeof(*root), GFP_KERNEL); if (!root) return -ENOMEM;
ctx->root = root; init_cgroup_root(ctx);
ret = cgroup_setup_root(root, ctx->subsys_mask); }
Because the mountpoinst are different names, every mount will produce a new cgroup root and the cgroup root link to the subsys of cgroup. The cgroup_root represents the root of a cgroup hierarchy which is organized as a tree. Every tree is a hierarchy structure and it is independent. The child cgroups from cgroup root can only inherit the sussystem with parent cgroup and can not quickly visit other subsystems in cgroup v1. Though it has a root_list to store all the cgroup root, it is hard to cooperate with each other.
/* * A cgroup_root represents the root of a cgroup hierarchy, and may be * associated with a kernfs_root to form an active hierarchy. This is * internal to cgroup core. Don't access directly from controllers. */ struct cgroup_root { struct kernfs_root *kf_root;
/* The bitmask of subsystems attached to this hierarchy */ unsigned int subsys_mask;
/* Unique id for this hierarchy. */ int hierarchy_id;
/* * The root cgroup. The containing cgroup_root will be destroyed on its * release. cgrp->ancestors[0] will be used overflowing into the * following field. cgrp_ancestor_storage must immediately follow. */ struct cgroup cgrp;
/* must follow cgrp for cgrp->ancestors[0], see above */ struct cgroup *cgrp_ancestor_storage;
/* Number of cgroups in the hierarchy, used only for /proc/cgroups */ atomic_t nr_cgrps;
/* A list running through the active hierarchies */ struct list_head root_list;
/* Hierarchy-specific flags */ unsigned int flags;
/* The path to use for release notifications. */ char release_agent_path[PATH_MAX];
/* The name for this hierarchy - may be empty */ char name[MAX_CGROUP_ROOT_NAMELEN]; };
But in the cgroup v2, all the subsystems are bind to one cgroup_root because it is only one mountpoint and normally using the default cgroup root:
1 2 3 4 5 6 7 8 9 10 11 12 13 14 15 16 17 18
static int cgroup_get_tree(struct fs_context *fc) { struct cgroup_fs_context *ctx = cgroup_fc2context(fc); int ret;
The default cgroup has all subsys_mask. All the child cgroup from the root cgroup will bind the subsystem cgroup by enabling it in the parent cgroup’s cgroup.subtree_control. So the different subsystems can have easier cooperation with each other.
1 2 3 4 5 6 7 8 9 10
int __init cgroup_init(void) { for_each_subsys(ss, ssid) { list_add_tail(&init_css_set.e_cset_node[ssid], &cgrp_dfl_root.cgrp.e_csets[ssid]);
cgrp_dfl_root.subsys_mask |= 1 << ss->id; } }
How kernel implement the cgroup v2 writeback
After the kernel added a unified cgroup hierarchy, another patch writeback: cgroup writeback support merged in January, 2015. It adds a feature and framework to support the writeback control by cgroup. Then the ext4 filesystem added the support with writeback cgroup ext4: implement cgroup writeback support at Jun, 2015. But xfs filesystem implements the support at [V2] xfs: implement cgroup writeback support on March, 2018. So on some old kernel versions, the xfs filesystem does not support cgroup writeback.
Now let’s do the deep dive about how the kernel implements the cgroup writeback. The implementation of cgroup writeback is complex with many different packages and adds many new changes after the original patch. Here we just analyze and focus on the latest kernel version and skip the history and change from the first patch.
There is full flow of write:
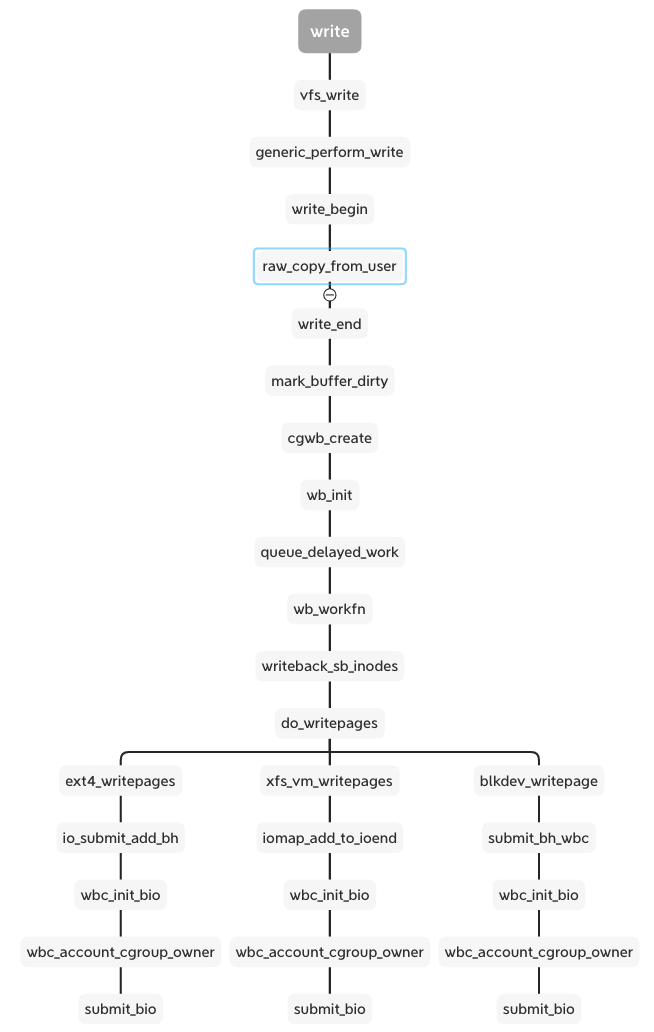
As the write as example, there is the simplify flow from syscall of write to enter of block layer:
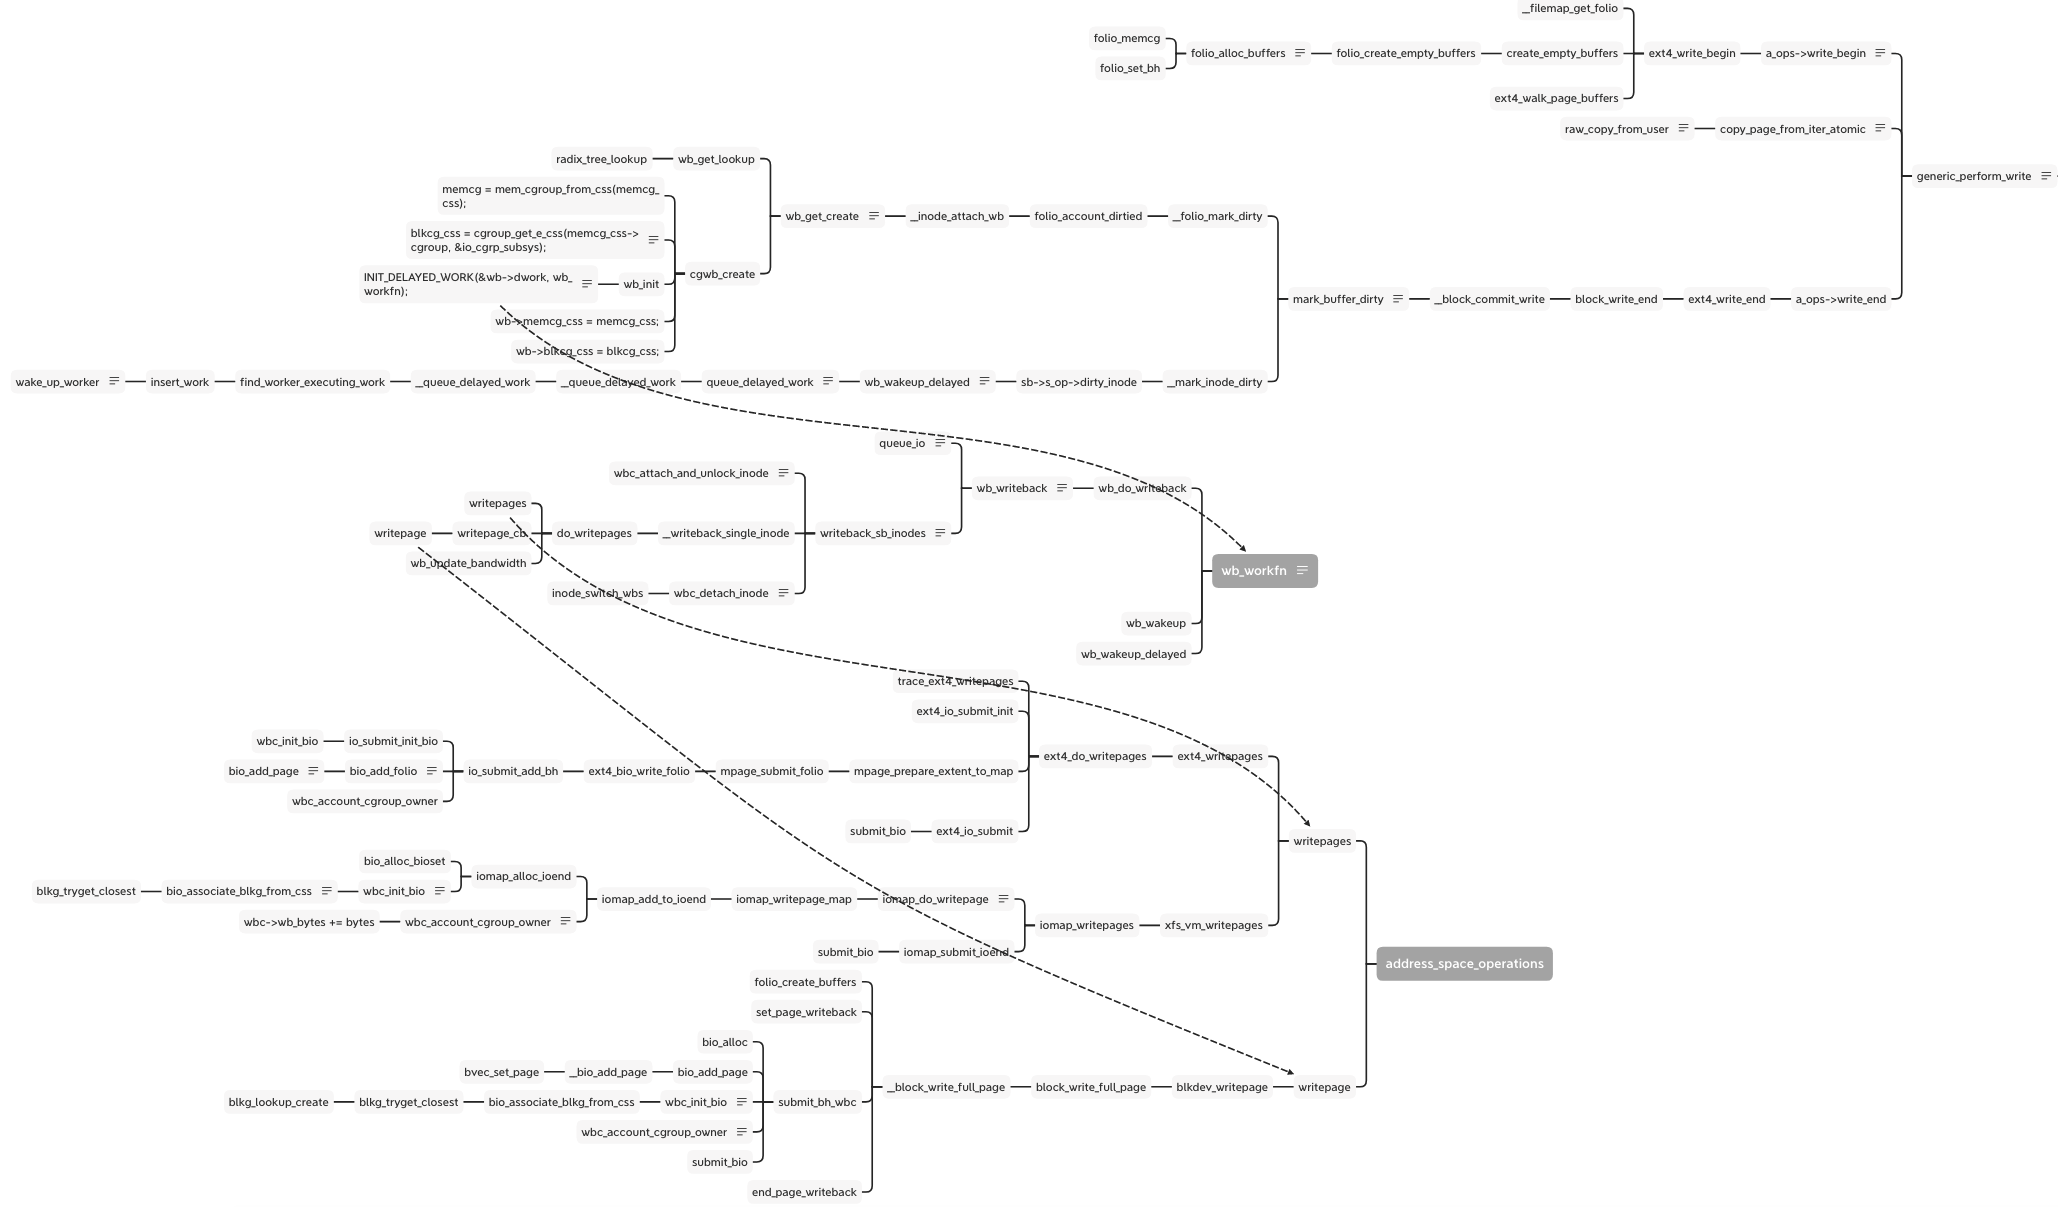
When calling the write syscall with buffer io, vfs calls the generic_perform_write function and runs the interface write_begin and write_end in proper order. Between them, the raw_copy_from_user is the real data write from the user space into the kernel space of the memory area. In the write_end stage, mark_buffer_dirty function marks the memory page and inode is dirty and wait to writeout:
/* * Very *carefully* optimize the it-is-already-dirty case. * * Don't let the final "is it dirty" escape to before we * perhaps modified the buffer. */ if (buffer_dirty(bh)) { smp_mb(); if (buffer_dirty(bh)) return; }
folio_memcg_lock(folio); if (!folio_test_set_dirty(folio)) { mapping = folio->mapping; if (mapping) __folio_mark_dirty(folio, mapping, 0); } folio_memcg_unlock(folio); if (mapping) __mark_inode_dirty(mapping->host, I_DIRTY_PAGES); } }
The __mark_inode_dirty function calls the __inode_attach_wb to create a bdi_writeback structure and attach the inode into it. The cgwb_create function creates a bdi_writeback for this memory cgroup and adds it into the bdi->cgwb_tree and by wb_get_lookup to get the bdi_writeback.
/* * There may be multiple instances of this function racing to * update the same inode. Use cmpxchg() to tell the winner. */ if (unlikely(cmpxchg(&inode->i_wb, NULL, wb))) wb_put(wb); }
// wb_get_create - get wb for a given memcg, create if necessary struct bdi_writeback *wb_get_create(struct backing_dev_info *bdi, struct cgroup_subsys_state *memcg_css, gfp_t gfp) { struct bdi_writeback *wb;
might_alloc(gfp);
if (!memcg_css->parent) return &bdi->wb;
do { wb = wb_get_lookup(bdi, memcg_css); } while (!wb && !cgwb_create(bdi, memcg_css, gfp));
return wb; }
The cgwb_create function is important, because it get the IO subsystem blkcg_css according to the memory cgroup by cgroup_get_e_css.
For the cgroup v2, the cgroup_get_e_css gets the IO css from the cgroup because all the subsystems bind to the cgroup. But for the cgroup v1, only the subsystem currently binds to the cgroup, so the cgroup_css returns NULL and goes back to the parent cgroup and finally gets the empty cgroup and breaks the loop. Then return the init IO css. But this css doesn’t contain the process and cgroup information. I think it is just for compatibility with cgroup v1 to return the init css.
Besides binding the cgroup, bdi and inode, the bdi_writeback needs to attach a real worker function to flush the diary page out to disk. This step at wb_init:
The __mark_inode_dirty adds this work into the delayed work queue for the idle worker to do the flush work. The wb_update_bandwidth_workfn according to the writeback IO time, dirty writeback numbers and the completion writeback numbers to calculate the bandwidth of the writeback and update the dirty_ratelimit. There are some algorithms but not the point in this topic, just skip them.
1 2 3 4 5 6 7 8 9 10 11 12 13 14 15
static void __wb_update_bandwidth(struct dirty_throttle_control *gdtc, struct dirty_throttle_control *mdtc, bool update_ratelimit) { /* * Lockless checks for elapsed time are racy and delayed update after * IO completion doesn't do it at all (to make sure written pages are * accounted reasonably quickly). Make sure elapsed >= 1 to avoid * division errors. */ elapsed = max(now - wb->bw_time_stamp, 1UL); dirtied = percpu_counter_read(&wb->stat[WB_DIRTIED]); written = percpu_counter_read(&wb->stat[WB_WRITTEN]); … }
1 2 3 4 5 6 7 8 9 10 11 12 13 14 15
/* * Maintain wb->dirty_ratelimit, the base dirty throttle rate. * * Normal wb tasks will be curbed at or below it in long term. * Obviously it should be around (write_bw / N) when there are N dd tasks. */ static void wb_update_dirty_ratelimit(struct dirty_throttle_control *dtc, unsigned long dirtied, unsigned long elapsed) { balanced_dirty_ratelimit = div_u64((u64)task_ratelimit * write_bw, dirty_rate | 1); WRITE_ONCE(wb->dirty_ratelimit, max(dirty_ratelimit, 1UL)); wb->balanced_dirty_ratelimit = balanced_dirty_ratelimit; }
Now the wb has been prepared, it links to the real worker waiting to write out. It links to the inode, bdi, memory cgroup and IO cgoup. They can provide the information when writing out.
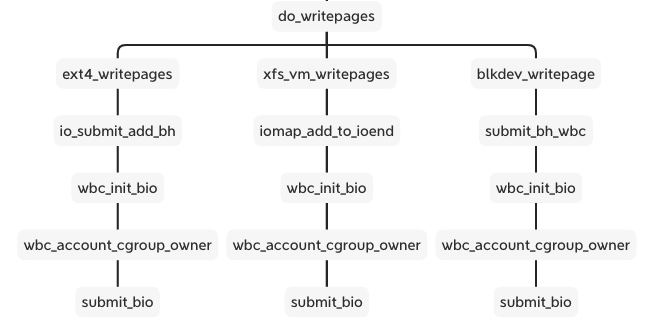
The wb_workfn function runs the __writeback_single_inode and calls the interface of writepages or writepage. The different file system and backend implement the interfaces. But they have a similar process including wbc_init_bio and wbc_account_cgroup_owner before submitting the bio.
These two functions are patches added to the xfs and ext4 cgroup writeback support. We can see the cgroup v2 documentation about Filesystem Support for Writeback:
1 2 3 4 5 6 7 8 9 10 11 12 13 14 15 16 17 18 19
Filesystem Support for Writeback --------------------------------
A filesystem can support cgroup writeback by updating address_space_operations->writepage[s]() to annotate bio's using the following two functions.
wbc_init_bio(@wbc, @bio) Should be called for each bio carrying writeback data and associates the bio with the inode's owner cgroup and the corresponding request queue. This must be called after a queue (device) has been associated with the bio and before submission.
wbc_account_cgroup_owner(@wbc, @page, @bytes) Should be called for each data segment being written out. While this function doesn't care exactly when it's called during the writeback session, it's the easiest and most natural to call it as data segments are added to a bio.
The wbc is writeback_control which manages and controls total writeback flow and stores the bdi_writeback and inode.
1 2 3 4 5 6 7 8 9 10 11 12 13 14 15
/* * A control structure which tells the writeback code what to do. These are * always on the stack, and hence need no locking. They are always initialised * in a manner such that unspecified fields are set to zero. */ struct writeback_control { long nr_to_write; /* Write this many pages, and decrement this for each page written */ … #ifdef CONFIG_CGROUP_WRITEBACK struct bdi_writeback *wb; /* wb this writeback is issued under */ struct inode *inode; /* inode being written out */ #endif };
wbc_init_bio() binds the specified bio to its cgroup which binds at cgwb_create function.
1 2 3 4 5 6 7 8 9 10 11
static inline void wbc_init_bio(struct writeback_control *wbc, struct bio *bio) { /* * pageout() path doesn't attach @wbc to the inode being written * out. This is intentional as we don't want the function to block * behind a slow cgroup. Ultimately, we want pageout() to kick off * regular writeback instead of writing things out itself. */ if (wbc->wb) bio_associate_blkg_from_css(bio, wbc->wb->blkcg_css); }
1 2 3 4 5 6 7 8 9 10 11 12 13 14
// bio_associate_blkg_from_css - associate a bio with a specified css void bio_associate_blkg_from_css(struct bio *bio, struct cgroup_subsys_state *css) { if (bio->bi_blkg) blkg_put(bio->bi_blkg);
Here the bio binds to the IO cgroup on bi_blkg, if the css is empty, it will bind to the root cgroup.
The wbc_account_cgroup_owner is a solution for this question: if multiple processes from different cgroup write into the same inode, how to decide who is the owner of this inode right now. The wbc_account_cgroup_owner counts the pages to different cgroup by memory id. After finishing the current writeback, the wbc_detach_inode function uses Boyer-Moore majority vote algorithm to select the owner of this inode, then calls inode_switch_wbs to switch the bdi_writeback for the inode.
/* * pageout() path doesn't attach @wbc to the inode being written * out. This is intentional as we don't want the function to block * behind a slow cgroup. Ultimately, we want pageout() to kick off * regular writeback instead of writing things out itself. */ if (!wbc->wb || wbc->no_cgroup_owner) return;
folio = page_folio(page); css = mem_cgroup_css_from_folio(folio); /* dead cgroups shouldn't contribute to inode ownership arbitration */ if (!(css->flags & CSS_ONLINE)) return;
id = css->id;
if (id == wbc->wb_id) { wbc->wb_bytes += bytes; return; }
if (id == wbc->wb_lcand_id) wbc->wb_lcand_bytes += bytes;
/* Boyer-Moore majority vote algorithm */ if (!wbc->wb_tcand_bytes) wbc->wb_tcand_id = id; if (id == wbc->wb_tcand_id) wbc->wb_tcand_bytes += bytes; else wbc->wb_tcand_bytes -= min(bytes, wbc->wb_tcand_bytes); }
/** * mem_cgroup_css_from_folio - css of the memcg associated with a folio * @folio: folio of interest * * If memcg is bound to the default hierarchy, css of the memcg associated * with @folio is returned. The returned css remains associated with @folio * until it is released. * * If memcg is bound to a traditional hierarchy, the css of root_mem_cgroup * is returned. */ struct cgroup_subsys_state *mem_cgroup_css_from_folio(struct folio *folio) { struct mem_cgroup *memcg = folio_memcg(folio);
if (!memcg || !cgroup_subsys_on_dfl(memory_cgrp_subsys)) memcg = root_mem_cgroup;
return &memcg->css; }
The cgroup v1 returns the root cgroup as well because it can not handle this case.
So in cgroup v2, before entering the block layer, the filesystem layer has decided which IO cgroup binds to this bio according to the inode and memory cgroup. The bio contains the io cgroup and then it is transferred to direct IO after calling submit_bio.
1 2 3 4 5 6 7 8 9 10 11 12 13
struct bio { … #ifdef CONFIG_BLK_CGROUP /* * Represents the association of the css and request_queue for the bio. * If a bio goes direct to device, it will not have a blkg as it will * not have a request_queue associated with it. The reference is put * on release of the bio. */ struct blkcg_gq *bi_blkg; struct bio_issue bi_issue; … }
How IO throttling in block layer
There are the different throttling files with cgroup v1 and v2
In cgroup v2 we only need to set all the disk IO limitations like read/write bps and iops on io.max file. Once we set the io.max, all the blk cgroup configs are set to the throtl_grp structure by tg_set_limit. Here the doc focusing on the cgroup v2 implementation.
When registering the blk throttle to the disk, it sets the throtl_slice according to different disk types. That is the default window of calculating the throttling IO.
Following the tg_set_limit function, the tg_conf_updated is important function to update the throtl_grp and calculate the wait time and dispatch time of the bio.
tg_update_has_rules(this_tg); /* ignore root/second level */ if (!cgroup_subsys_on_dfl(io_cgrp_subsys) || !blkg->parent || !blkg->parent->parent) continue; parent_tg = blkg_to_tg(blkg->parent); /* * make sure all children has lower idle time threshold and * higher latency target */ this_tg->idletime_threshold = min(this_tg->idletime_threshold, parent_tg->idletime_threshold); this_tg->latency_target = max(this_tg->latency_target, parent_tg->latency_target); }
/* * We're already holding queue_lock and know @tg is valid. Let's * apply the new config directly. * * Restart the slices for both READ and WRITES. It might happen * that a group's limit are dropped suddenly and we don't want to * account recently dispatched IO with new low rate. */ throtl_start_new_slice(tg, READ, false); throtl_start_new_slice(tg, WRITE, false);
if (tg->flags & THROTL_TG_PENDING) { tg_update_disptime(tg); throtl_schedule_next_dispatch(sq->parent_sq, true); } }
/* see throtl_add_bio_tg() */ tg->flags &= ~THROTL_TG_WAS_EMPTY; }
The dispatch time use the minimum of the write wait time and read wait time calculated by the tg_may_dispatch. Then add the throtl_grp into the service queue wait to dispatch. Every update the io.max, the kernel need new window slice to throttling.
The global variable jiffies holds the number of ticks that have occurred since the system booted. On boot, the kernel initializes the variable to zero, and it is incremented by one during each timer interrupt. Thus, because there are HZ timer interrupts in a second, there are HZ jiffies in a second. The system uptime is therefore jiffies/HZ seconds.
It is similar for the disk IO to the cpu: dividing the disk resource into time according to the disk frequency. The “time” is not the real linear time but it is “jiffy” which the numbers of the tick from uptime. So the uptime = jiffies / HZ.
The core algorithm is that for every cgroup for this disk, kernel use sibling window (slice) to decide how much time the bio need to wait or just dispatch. It calculates the max bps or iops in this window. If the latest bio is exceed the numbers of the bps or iops, it extends the window and wait time of the window end. So it is not the fixed slice except the new slice of beginning. The details of the implement is in the tg_may_dispatch.
/* * Returns whether one can dispatch a bio or not. Also returns approx number * of jiffies to wait before this bio is with-in IO rate and can be dispatched */ static bool tg_may_dispatch(struct throtl_grp *tg, struct bio *bio, unsigned long *wait) { bool rw = bio_data_dir(bio); unsigned long bps_wait = 0, iops_wait = 0, max_wait = 0; u64 bps_limit = tg_bps_limit(tg, rw); u32 iops_limit = tg_iops_limit(tg, rw);
/* * Currently whole state machine of group depends on first bio * queued in the group bio list. So one should not be calling * this function with a different bio if there are other bios * queued. */ BUG_ON(tg->service_queue.nr_queued[rw] && bio != throtl_peek_queued(&tg->service_queue.queued[rw]));
/* If tg->bps = -1, then BW is unlimited */ if ((bps_limit == U64_MAX && iops_limit == UINT_MAX) || tg->flags & THROTL_TG_CANCELING) { if (wait) *wait = 0; return true; }
/* * If previous slice expired, start a new one otherwise renew/extend * existing slice to make sure it is at least throtl_slice interval * long since now. New slice is started only for empty throttle group. * If there is queued bio, that means there should be an active * slice and it should be extended instead. */ if (throtl_slice_used(tg, rw) && !(tg->service_queue.nr_queued[rw])) throtl_start_new_slice(tg, rw, true); else { if (time_before(tg->slice_end[rw], jiffies + tg->td->throtl_slice)) throtl_extend_slice(tg, rw, jiffies + tg->td->throtl_slice); }
if (time_before(tg->slice_end[rw], jiffies + max_wait)) throtl_extend_slice(tg, rw, jiffies + max_wait);
return false; }
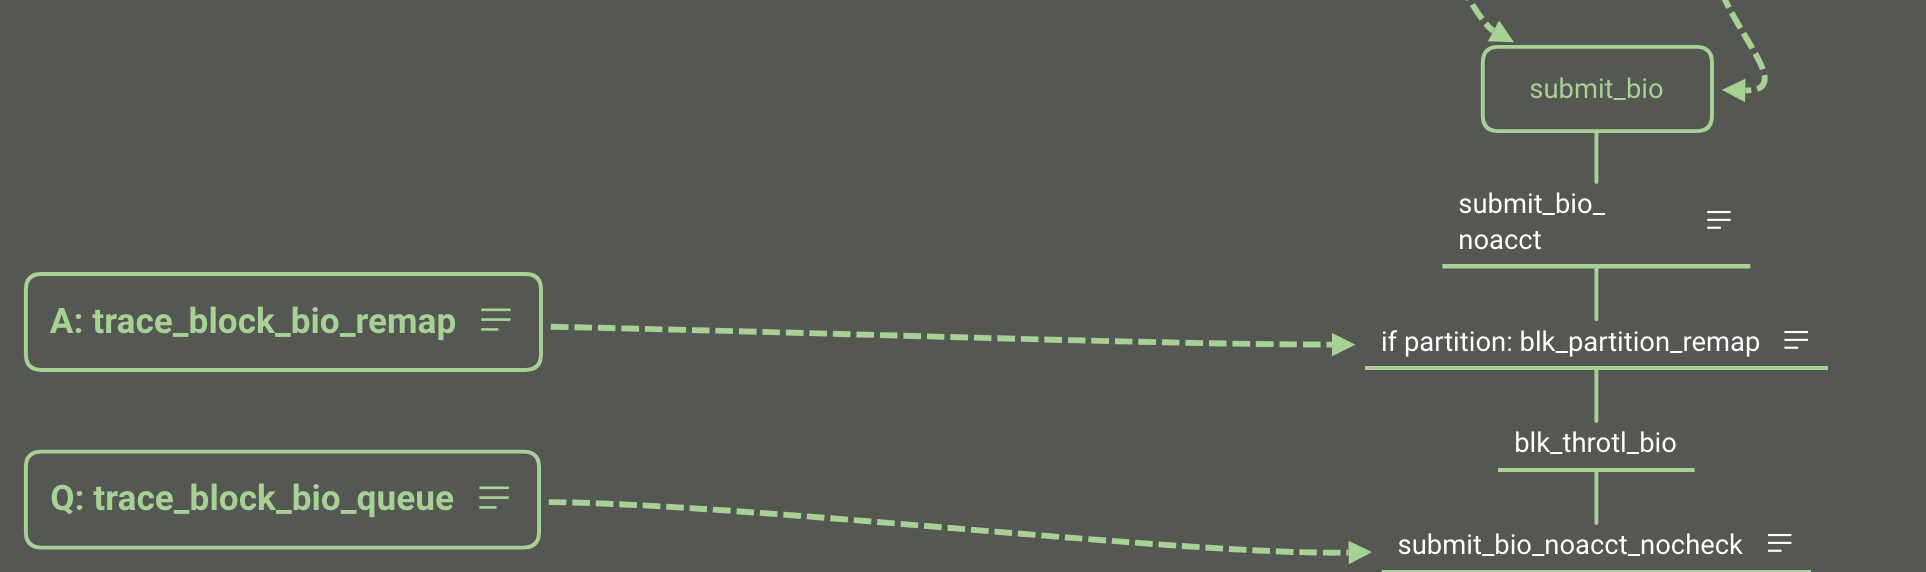
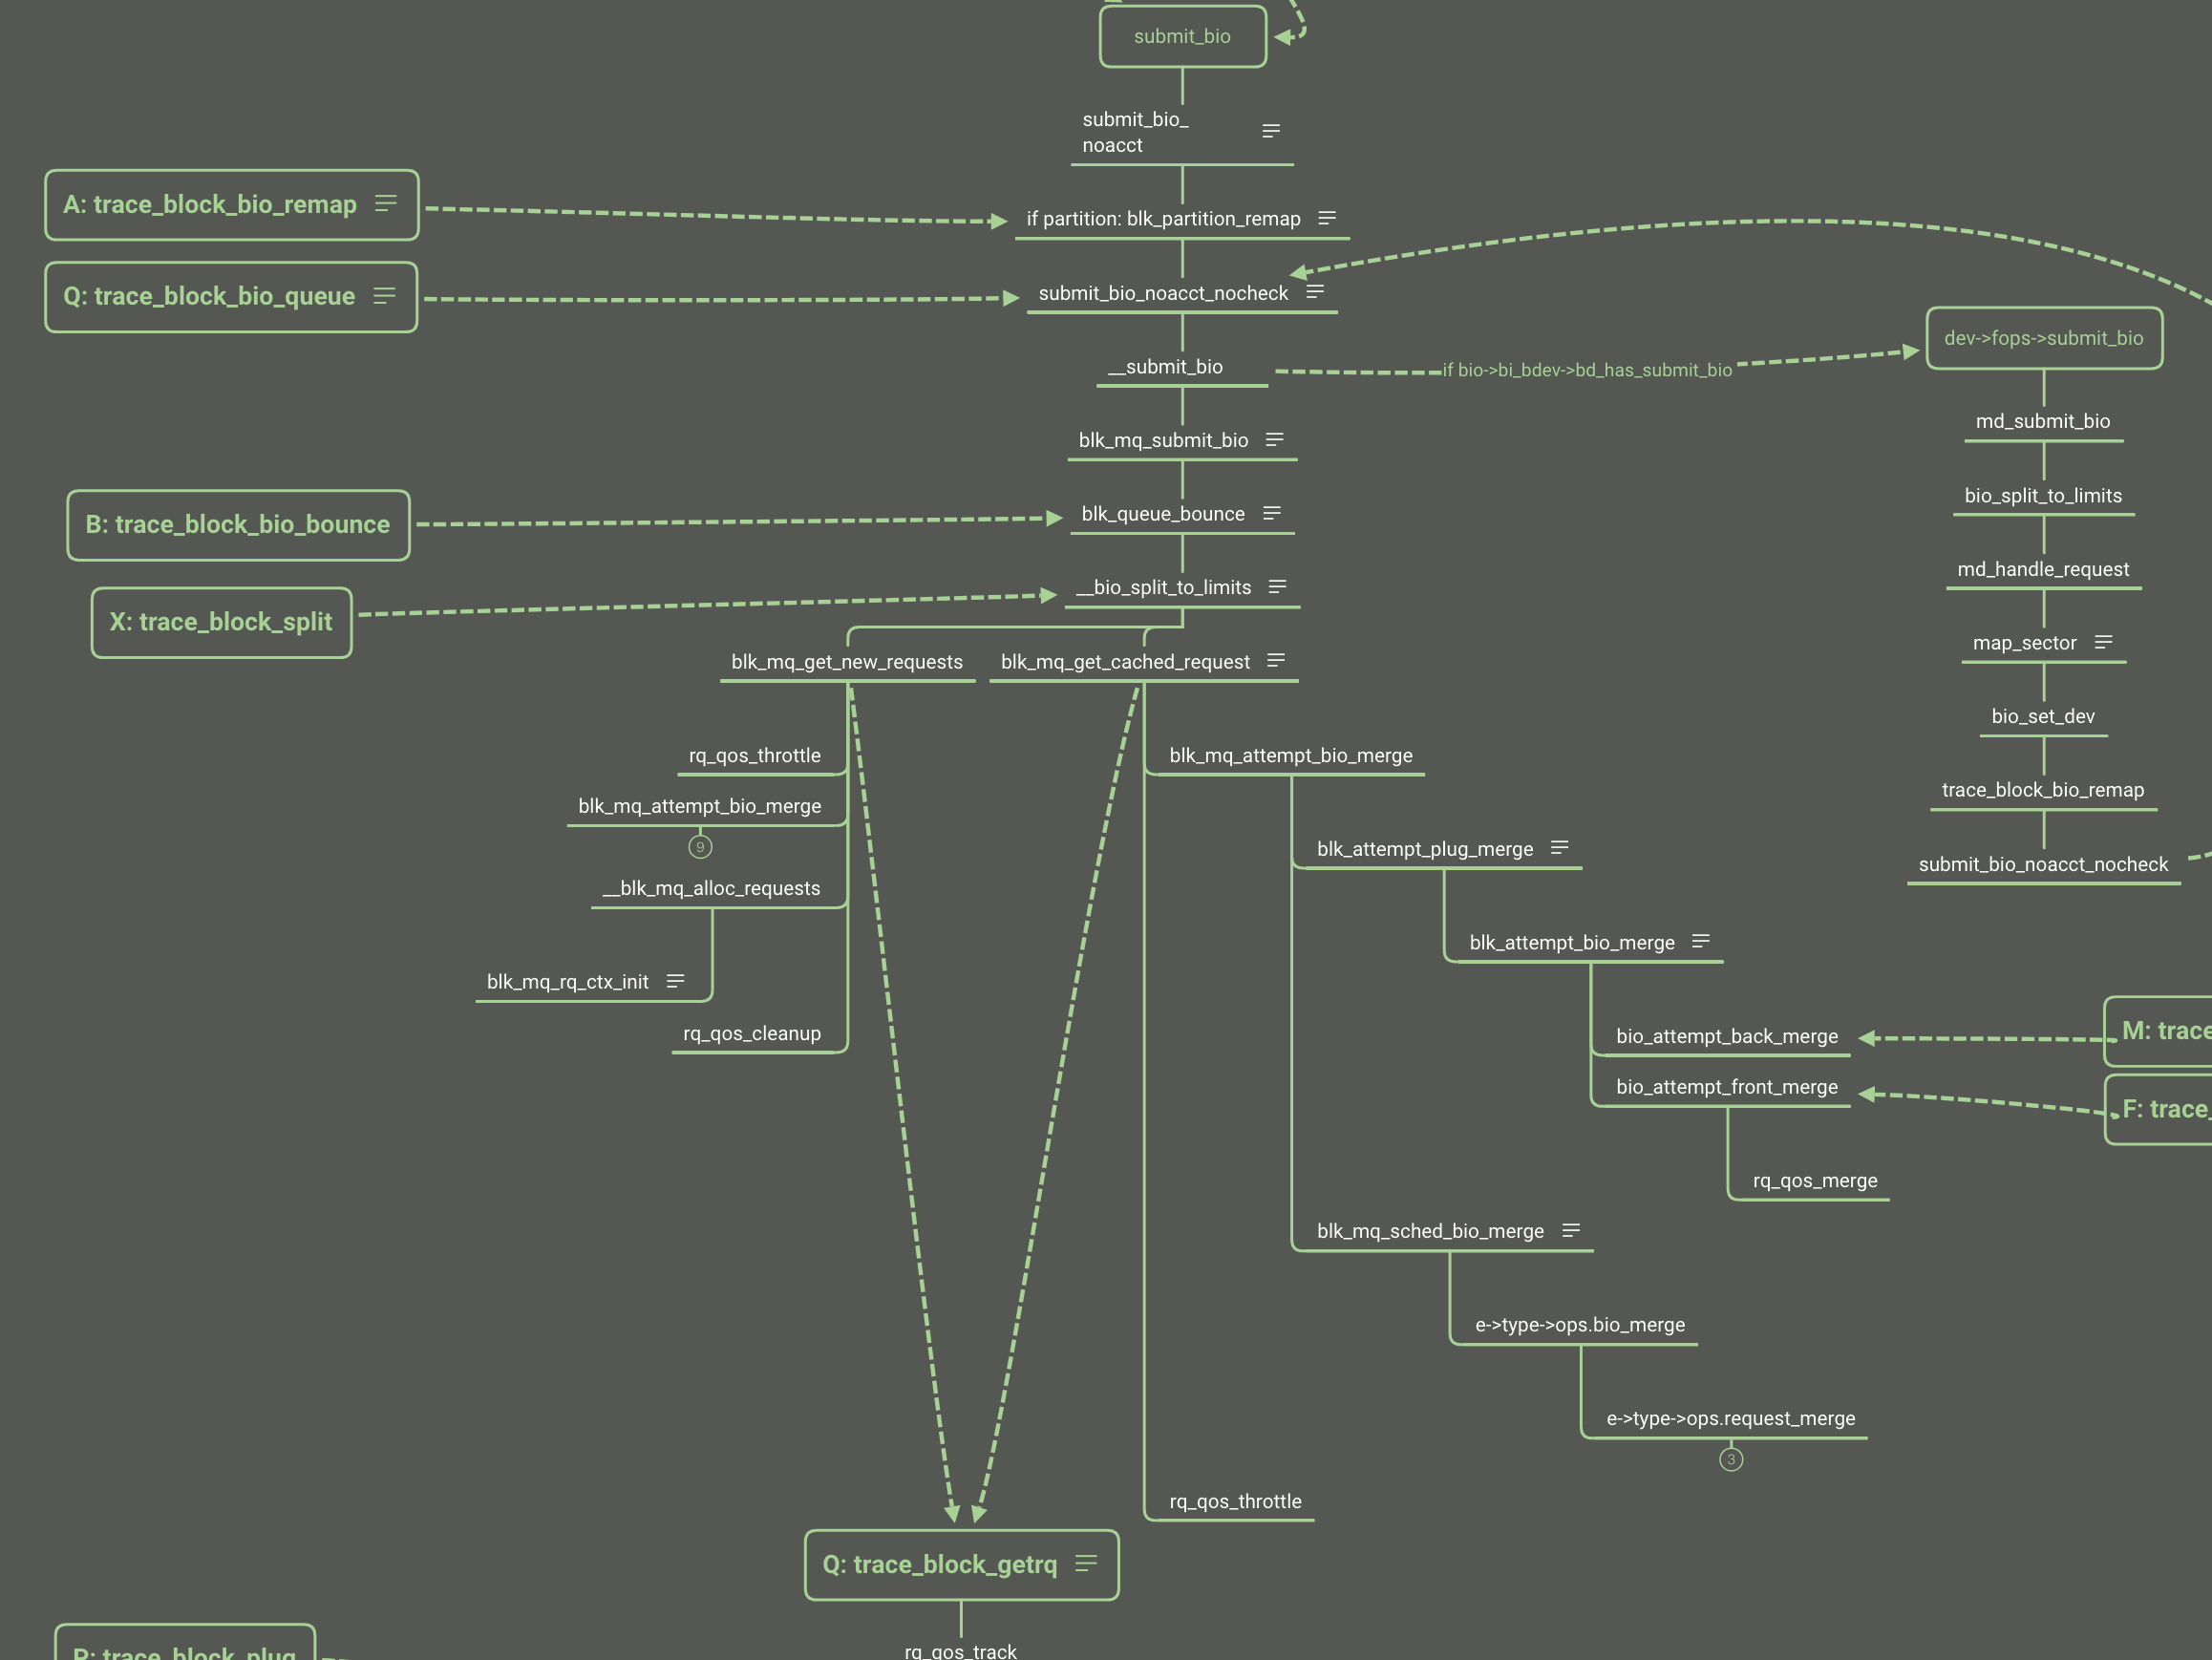
Now we look back to the bio follow and the blk_throtl_bio is between the A and Q.
If set to io.max, every bio goes through the _blk_throtl_bio and runs tg_may_dispatch to check whether the bio can be dispatched directly or not. If not, calculate the wait time and update the timer with the minimum wait time from the rb_tree. Finally it adds the bio into the service queue and waits for the timer to run the next dispatch loop.
Disk IO QoS
Both of them are controlled by the rq_qos structure:
We have learned the block layer basic follow and we can know the place of rq_qos throttling.
IO QoS has complicated algorithms for different policy and implementation. Here is just making an entrance but not deep diving. I will make another article to talk about the disk IO QoS.
CSI Inline Volume Become Orphan After Kubelet Restart When Pod Terminating
Problem
When the pod is terminating and csi inline volume is deleted, the kubelet down or restart impact the volume become orphan and pod skip delete and unmount the volume. The error message show as follow:
1 2 3 4 5 6 7 8 9 10 11 12 13 14
Mar 12 00:28:56 tess-node-kltc4-tess19.stratus.lvs.ebay.com kubelet[1526549]: I0312 00:28:56.150307 1526549 state_mem.go:36] "Initialized new in-memory state store" Mar 12 00:28:56 tess-node-kltc4-tess19.stratus.lvs.ebay.com kubelet[1526549]: E0312 00:28:56.153369 1526549 server.go:302] "Failed to run kubelet" err="failed to run Kubelet: unable to determine runtime API version: rpc error: code = Unknown desc = server is not initialized yet" Mar 12 00:28:56 tess-node-kltc4-tess19.stratus.lvs.ebay.com systemd[1]: kubelet.service: Main process exited, code=exited, status=1/FAILURE Mar 12 00:28:56 tess-node-kltc4-tess19.stratus.lvs.ebay.com systemd[1]: kubelet.service: Failed with result 'exit-code'. Mar 12 00:28:58 tess-node-kltc4-tess19.stratus.lvs.ebay.com systemd[1]: kubelet.service: Scheduled restart job, restart counter is at 1. Mar 12 00:28:58 tess-node-kltc4-tess19.stratus.lvs.ebay.com systemd[1]: Stopped Kubernetes Kubelet Server. Mar 12 00:28:58 tess-node-kltc4-tess19.stratus.lvs.ebay.com systemd[1]: Started Kubernetes Kubelet Server. ... Mar 12 00:29:01 tess-node-kltc4-tess19.stratus.lvs.ebay.com kubelet[1526901]: I0312 00:29:01.976957 1526901 reconciler.go:388] "Could not construct volume information, cleaning up mounts" podName=1517b38e-fa84-4138-b6c0-06663741e385 volumeSpecName="data" err="failed to GetVolumeName from volumePlugin for volumeSpec \"data\" err=kubernetes.io/csi: plugin.GetVolumeName failed to extract volume source from spec: unexpected api.CSIVolumeSource found in volume.Spec" Mar 12 00:29:01 tess-node-kltc4-tess19.stratus.lvs.ebay.com kubelet[1526901]: I0312 00:29:01.976982 1526901 reconciler.go:421] "Reconciler sync states: could not find volume information in desired state, clean up the mount points" podName=1517b38e-fa84-4138-b6c0-06663741e385 volumeSpecName="data" Mar 12 00:29:01 tess-node-kltc4-tess19.stratus.lvs.ebay.com kubelet[1526901]: E0312 00:29:01.981982 1526901 operation_generator.go:952] UnmountVolume.MarkVolumeMountAsUncertain failed for volume "" (UniqueName: "data") pod "1517b38e-fa84-4138-b6c0-06663741e385" (UID: "1517b38e-fa84-4138-b6c0-06663741e385") : no volume with the name "data" exists in the list of attached volumes Mar 12 00:29:01 tess-node-kltc4-tess19.stratus.lvs.ebay.com kubelet[1526901]: E0312 00:29:01.982029 1526901 nestedpendingoperations.go:335] Operation for "{volumeName:data podName:1517b38e-fa84-4138-b6c0-06663741e385 nodeName:}" failed. No retries permitted until 2024-03-12 00:29:02.482017035 -0700 -07 m=+1.794257422 (durationBeforeRetry 500ms). Error: UnmountVolume.TearDown failed for volume "" (UniqueName: "data") pod "1517b38e-fa84-4138-b6c0-06663741e385" (UID: "1517b38e-fa84-4138-b6c0-06663741e385") : kubernetes.io/csi: Unmounter.TearDownAt failed: rpc error: code = Aborted desc = NodeUnpublish operation for volume csi-c6b0a910c881c66f817829d6c0815f60d2dee9c028369214c6f1224be8139978 still ongoing Mar 12 00:29:44 tess-node-kltc4-tess19.stratus.lvs.ebay.com kubelet[1526901]: I0312 00:29:44.655173 1526901 kubelet.go:2126] "SyncLoop DELETE" source="api" pods=[kube-system/fio-test-6b7df68464-r66bv] Mar 12 00:29:44 tess-node-kltc4-tess19.stratus.lvs.ebay.com kubelet[1526901]: I0312 00:29:44.658223 1526901 kubelet.go:2120] "SyncLoop REMOVE" source="api" pods=[kube-system/fio-test-6b7df68464-r66bv]
From the error messages, we can know what happened:
1 2 3 4 5 6 7 8
Kubelet restart -> reconstructVolume -> get csi volume plugin by FindAttachablePluginByName and FindDeviceMountablePluginByName -> util.GetUniqueVolumeNameFromSpec -> volumePlugin.GetVolumeName -> getPVSourceFromSpec -> get error "unexpected api.CSIVolumeSource found in volume.Spec" because this function only check CSIPersistentVolumeSource
When reconstructVolume gets an error, the volume can not be added into the ActualStateOfWorld in kubelet, then the kubelet will skip this volume unmount when pod deleting.
1 2 3 4 5 6 7 8 9 10 11 12 13 14
reconstructedVolume, err := rc.reconstructVolume(volume) if err != nil { if volumeInDSW { // Some pod needs the volume, don't clean it up and hope that // reconcile() calls SetUp and reconstructs the volume in ASW. klog.V(4).InfoS("Volume exists in desired state, skip cleaning up mounts", "podName", volume.podName, "volumeSpecName", volume.volumeSpecName) continue } // No pod needs the volume. klog.InfoS("Could not construct volume information, cleaning up mounts", "podName", volume.podName, "volumeSpecName", volume.volumeSpecName, "err", err) rc.cleanupMounts(volume) continue }
So there is a bug that the csi ephemeral volume should go into ‘GetUniqueVolumeNameFromSpecWithPod’ not **‘GetUniqueVolumeNameFromSpec’. **That means csi ephemeral volume should not get the attachablePlugin and deviceMountablePlugin.
Actually, due to pod is terminating and pod not added into the DSW, when reconstructVolume failed, the kubelet still try to unmount and clean mountpoint for this volume:
func (dswp *desiredStateOfWorldPopulator) findAndAddNewPods() { // Map unique pod name to outer volume name to MountedVolume. mountedVolumesForPod := make(map[volumetypes.UniquePodName]map[string]cache.MountedVolume) if utilfeature.DefaultFeatureGate.Enabled(features.ExpandInUsePersistentVolumes) { for _, mountedVolume := range dswp.actualStateOfWorld.GetMountedVolumes() { mountedVolumes, exist := mountedVolumesForPod[mountedVolume.PodName] if !exist { mountedVolumes = make(map[string]cache.MountedVolume) mountedVolumesForPod[mountedVolume.PodName] = mountedVolumes } mountedVolumes[mountedVolume.OuterVolumeSpecName] = mountedVolume } }
processedVolumesForFSResize := sets.NewString() for _, pod := range dswp.podManager.GetPods() { if dswp.podStateProvider.ShouldPodContainersBeTerminating(pod.UID) { // Do not (re)add volumes for pods that can't also be starting containers continue } dswp.processPodVolumes(pod, mountedVolumesForPod, processedVolumesForFSResize) }
func (rc *reconciler) cleanupMounts(volume podVolume) { klog.V(2).InfoS("Reconciler sync states: could not find volume information in desired state, clean up the mount points", "podName", volume.podName, "volumeSpecName", volume.volumeSpecName) mountedVolume := operationexecutor.MountedVolume{ PodName: volume.podName, VolumeName: v1.UniqueVolumeName(volume.volumeSpecName), InnerVolumeSpecName: volume.volumeSpecName, PluginName: volume.pluginName, PodUID: types.UID(volume.podName), } // TODO: Currently cleanupMounts only includes UnmountVolume operation. In the next PR, we will add // to unmount both volume and device in the same routine. err := rc.operationExecutor.UnmountVolume(mountedVolume, rc.actualStateOfWorld, rc.kubeletPodsDir) if err != nil { klog.ErrorS(err, mountedVolume.GenerateErrorDetailed("volumeHandler.UnmountVolumeHandler for UnmountVolume failed", err).Error()) return } }
But in this time, the container was not finished the container termination, so the volume remove failed, this is the last chance to recycle the volume:
1 2 3 4 5 6 7 8 9 10 11 12 13 14 15 16
[CSI local driver]2024/03/29 03:10:59 logging.go:26: Serving /csi.v1.Node/NodeUnpublishVolume: req=volume_id:"csi-17ef0134f9c76245a954e751a3ebdb57a965d6cf5ea66a6f19bc4b6aa37bad11" target_path:"/var/mnt/kubelet/pods/8c76f1db-b963-4cfc-96b7-6f81fd9781f6/volumes/kubernetes.io~csi/data/mount"
[CSI local driver]2024/03/29 03:10:59 server.go:1111: Looking up volume with id=vg10000_csi-17ef0134f9c76245a954e751a3ebdb57a965d6cf5ea66a6f19bc4b6aa37bad11
[CSI local driver]2024/03/29 03:10:59 lvm.go:830: Executing: /usr/sbin/lvs --reportformat=json --units=b --nosuffix --options=lv_name,lv_size,vg_name,lv_path vg10000/vg10000_csi-17ef0134f9c76245a954e751a3ebdb57a965d6cf5ea66a6f19bc4b6aa37bad11
                  {"lv_name":"vg10000_csi-17ef0134f9c76245a954e751a3ebdb57a965d6cf5ea66a6f19bc4b6aa37bad11", "lv_size":"21474836480", "vg_name":"vg10000", "lv_path":"/dev/vg10000/vg10000_csi-17ef0134f9c76245a954e751a3ebdb57a965d6cf5ea66a6f19bc4b6aa37bad11"}
[CSI local driver]2024/03/29 03:11:03 server.go:1139: Removing volume with id=vg10000_csi-17ef0134f9c76245a954e751a3ebdb57a965d6cf5ea66a6f19bc4b6aa37bad11
[CSI local driver]2024/03/29 03:11:03 lvm.go:830: Executing: /usr/sbin/lvs --reportformat=json --units=b --nosuffix --options=lv_name,lv_size,vg_name,lv_path vg10000/vg10000_csi-17ef0134f9c76245a954e751a3ebdb57a965d6cf5ea66a6f19bc4b6aa37bad11
                  {"lv_name":"vg10000_csi-17ef0134f9c76245a954e751a3ebdb57a965d6cf5ea66a6f19bc4b6aa37bad11", "lv_size":"21474836480", "vg_name":"vg10000", "lv_path":"/dev/vg10000/vg10000_csi-17ef0134f9c76245a954e751a3ebdb57a965d6cf5ea66a6f19bc4b6aa37bad11"}
2024/03/29 03:11:09 Cleanup lv "vg10000_csi-17ef0134f9c76245a954e751a3ebdb57a965d6cf5ea66a6f19bc4b6aa37bad11": StdoutBuf - "Calling mkfs"
2024/03/29 03:11:09 Cleanup lv "vg10000_csi-17ef0134f9c76245a954e751a3ebdb57a965d6cf5ea66a6f19bc4b6aa37bad11": StderrBuf - "mke2fs 1.45.5 (07-Jan-2020)"
2024/03/29 03:11:09 Cleanup lv "vg10000_csi-17ef0134f9c76245a954e751a3ebdb57a965d6cf5ea66a6f19bc4b6aa37bad11": StderrBuf - "/dev/vg10000/vg10000_csi-17ef0134f9c76245a954e751a3ebdb57a965d6cf5ea66a6f19bc4b6aa37bad11 is apparently in use by the system; will not make a filesystem here!"
2024/03/29 03:11:09 Cleanup lv "vg10000_csi-17ef0134f9c76245a954e751a3ebdb57a965d6cf5ea66a6f19bc4b6aa37bad11": StdoutBuf - "Calling wipefs"
2024/03/29 03:11:09 Cleanup lv "vg10000_csi-17ef0134f9c76245a954e751a3ebdb57a965d6cf5ea66a6f19bc4b6aa37bad11": StderrBuf - "wipefs: error: /dev/vg10000/vg10000_csi-17ef0134f9c76245a954e751a3ebdb57a965d6cf5ea66a6f19bc4b6aa37bad11: probing initialization failed: Device or resource busy"
2024/03/29 03:11:09 Cleanup lv "vg10000_csi-17ef0134f9c76245a954e751a3ebdb57a965d6cf5ea66a6f19bc4b6aa37bad11": StdoutBuf - "Quick reset completed"
[CSI local driver]2024/03/29 03:11:09 lvm.go:830: Executing: /usr/sbin/lvremove -f vg10000/vg10000_csi-17ef0134f9c76245a954e751a3ebdb57a965d6cf5ea66a6f19bc4b6aa37bad11
[CSI local driver]2024/03/29 03:11:18 lvm.go:837: stderr: Logical volume vg10000/vg10000_csi-17ef0134f9c76245a954e751a3ebdb57a965d6cf5ea66a6f19bc4b6aa37bad11 contains a filesystem in use.
[CSI local driver]2024/03/29 03:11:18 logging.go:30: /csi.v1.Node/NodeUnpublishVolume failed: err=rpc error: code = Internal desc = rpc error: code = Internal desc = Failed to remove volume: Failed to lvremove lv vg10000/vg10000_csi-17ef0134f9c76245a954e751a3ebdb57a965d6cf5ea66a6f19bc4b6aa37bad11: Logical volume vg10000/vg10000_csi-17ef0134f9c76245a954e751a3ebdb57a965d6cf5ea66a6f19bc4b6aa37bad11 contains a filesystem in use.
So the conditions of producing orphan csi inline volume should be:
Pod terminating
Kubelet restart or shutdown during pod terminating
Kubelet reconstructvolume failed and start unmount before container shutdown
/* per device-cgroup pair */ structioc_gq { structblkg_policy_datapd; structioc *ioc;
/* * A iocg can get its weight from two sources - an explicit * per-device-cgroup configuration or the default weight of the * cgroup. `cfg_weight` is the explicit per-device-cgroup * configuration. `weight` is the effective considering both * sources. * * When an idle cgroup becomes active its `active` goes from 0 to * `weight`. `inuse` is the surplus adjusted active weight. * `active` and `inuse` are used to calculate `hweight_active` and * `hweight_inuse`. * * `last_inuse` remembers `inuse` while an iocg is idle to persist * surplus adjustments. * * `inuse` may be adjusted dynamically during period. `saved_*` are used * to determine and track adjustments. */ u32 cfg_weight; u32 weight; u32 active; u32 inuse;
u32 last_inuse; s64 saved_margin;
sector_t cursor; /* to detect randio */
/* * `vtime` is this iocg's vtime cursor which progresses as IOs are * issued. If lagging behind device vtime, the delta represents * the currently available IO budget. If running ahead, the * overage. * * `vtime_done` is the same but progressed on completion rather * than issue. The delta behind `vtime` represents the cost of * currently in-flight IOs. */ atomic64_t vtime; atomic64_t done_vtime; u64 abs_vdebt;
/* current delay in effect and when it started */ u64 delay; u64 delay_at;
/* * The period this iocg was last active in. Used for deactivation * and invalidating `vtime`. */ atomic64_t active_period; structlist_headactive_list;
/* see __propagate_weights() and current_hweight() for details */ u64 child_active_sum; u64 child_inuse_sum; u64 child_adjusted_sum; int hweight_gen; u32 hweight_active; u32 hweight_inuse; u32 hweight_donating; u32 hweight_after_donation;
Comprehensive quick reference guide for Linux networking data structures, kernel functions, system calls, and debugging commands. Essential resource for network developers and system administrators.
Master essential Linux networking tools and scripts for debugging, performance testing, and network analysis. Learn packet tracing, comprehensive debugging, and systematic performance evaluation.